• Home
  • Product
  • Pricing
  • Learning
  • Partners
  • Contact
Menu
  • Home
  • Product
  • Pricing
  • Learning
  • Partners
  • Contact
free trial
demo

Product

All about SnowMirror

Product details

  • About SnowMirror
  • Features & Specifications
  • News
  • SnowMirror Backup
  • Videocast
  • How to Evaluate
Menu
  • About SnowMirror
  • Features & Specifications
  • News
  • SnowMirror Backup
  • Videocast
  • How to Evaluate

Support

  • Downloads
  • Admin Guide
  • User Manual
  • Frequent Questions
  • Release Notes
Menu
  • Downloads
  • Admin Guide
  • User Manual
  • Frequent Questions
  • Release Notes

Documents

  • Comparison Table
  • Data Sheets
  • Support Levels
  • EULA
Menu
  • Comparison Table
  • Data Sheets
  • Support Levels
  • EULA

How to Evaluate SnowMirror for ServiceNow

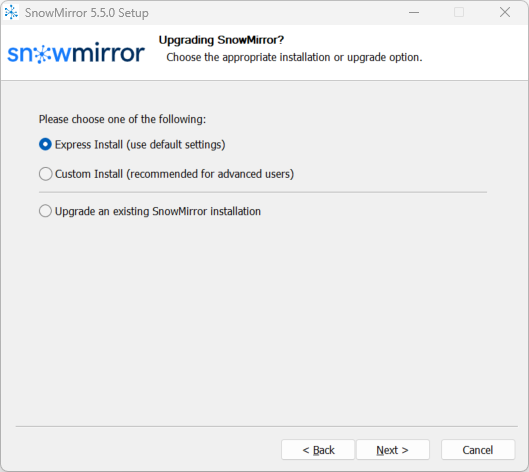
SnowMirror is very easy to install and configure and it has been designed to be as user-friendly as possible. However it is an enterprise tool and our experience is that the conditions and environments vary a lot. This post is intended to help new users to evaluate SnowMirror and its features the easiest possible way without any hurdles such as database build, ServiceNow credentials and permissions, server to deploy, etc.

Stage 1: Notebook, demo instance, embedded database (20 minutes)

The goal for the first stage is to have SnowMirror up and running on your own notebook without any database installation. This will enable you to get familiar with SnowMirror user interface and application control. You will be able to download data from one of our ServiceNow demo instances but you won’t be able to connect to the data. But don’t worry. That is Stage 2.


  1. Download the latest SnowMirror version for Windows
  2. Get a trial license for demo instances
  3. Install SnowMirror using all the defaults (Express Install)


  4. In the browser-based configuration wizard, enter the trial license key
  5. Enter the ven01468.service-now.com demo instance
  6. Use snowmirror/snowmirror credentials. Test by the Test Connection button.


  7. Select embedded database for this stage


  8. Setup a local SnowMirror user (e.g. mirror/password) and skip all other configuration options.
  9. Log into SnowMirror using the new user account (e.g. mirror/password)
  10. Create several synchronizations such as incident, task or sys_user tables
  11. Synchronize the data (either manually or by a scheduled run)


  12. Get familiar with the user interface, scheduler and most of other features

Stage 2: Test instance, target database (1 hour)

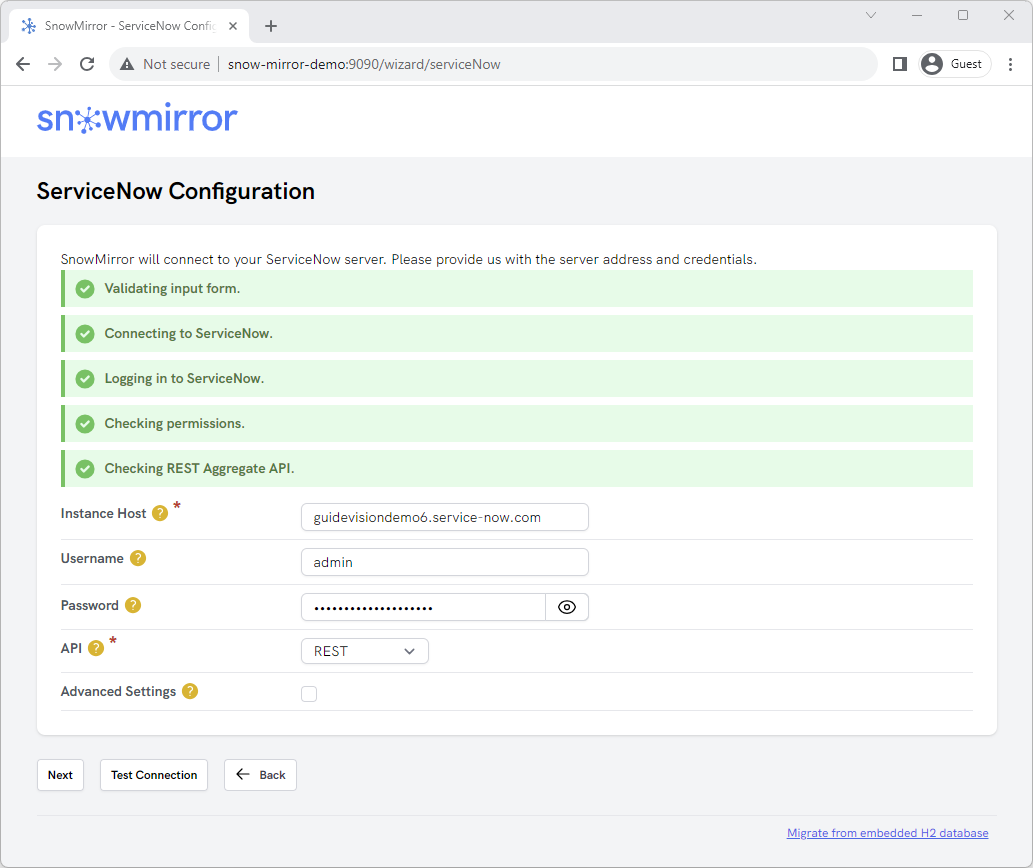
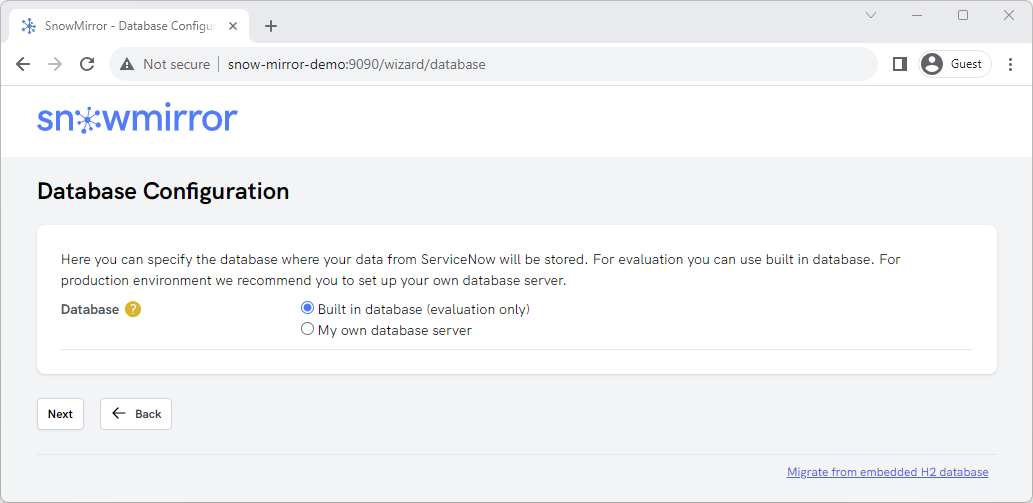
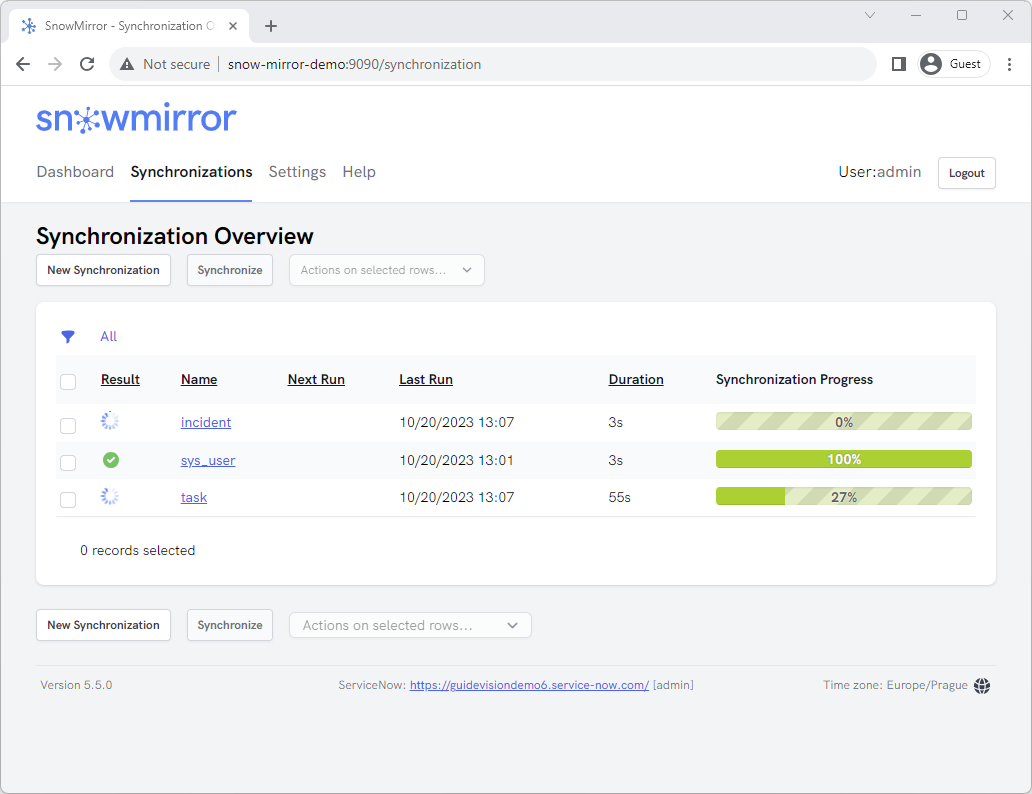
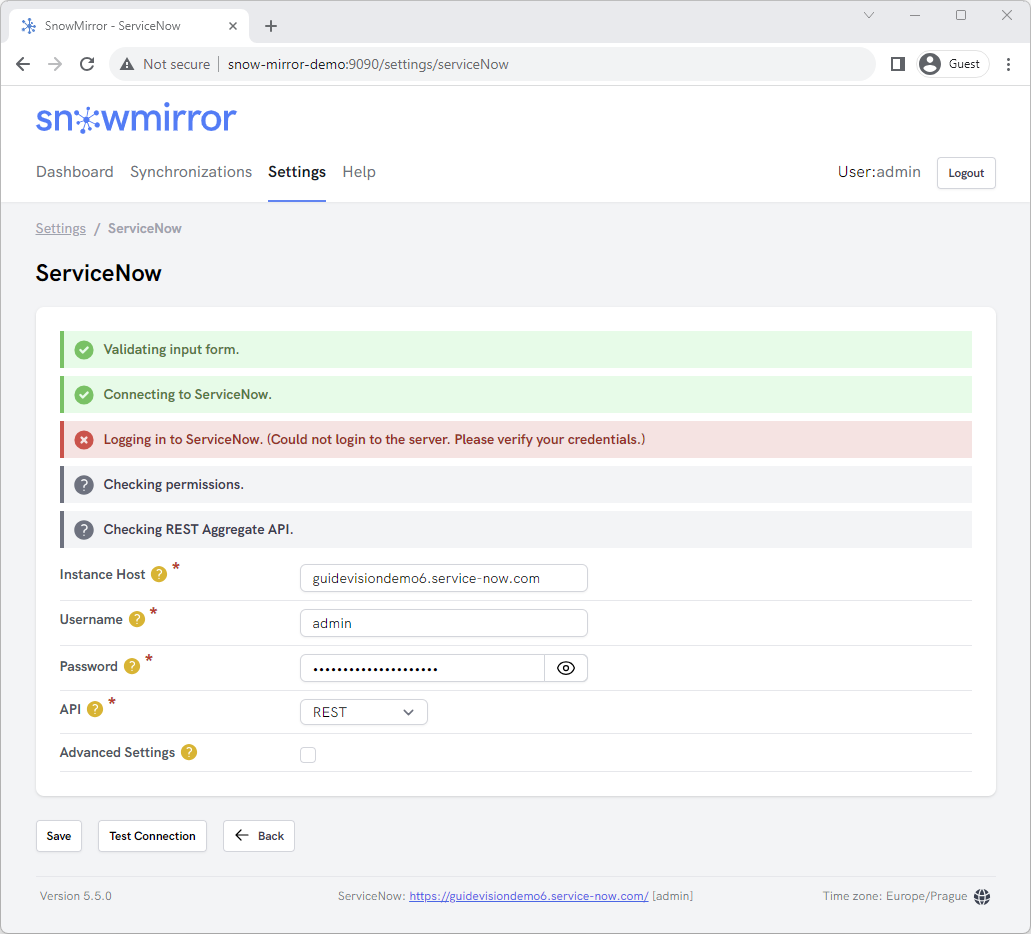
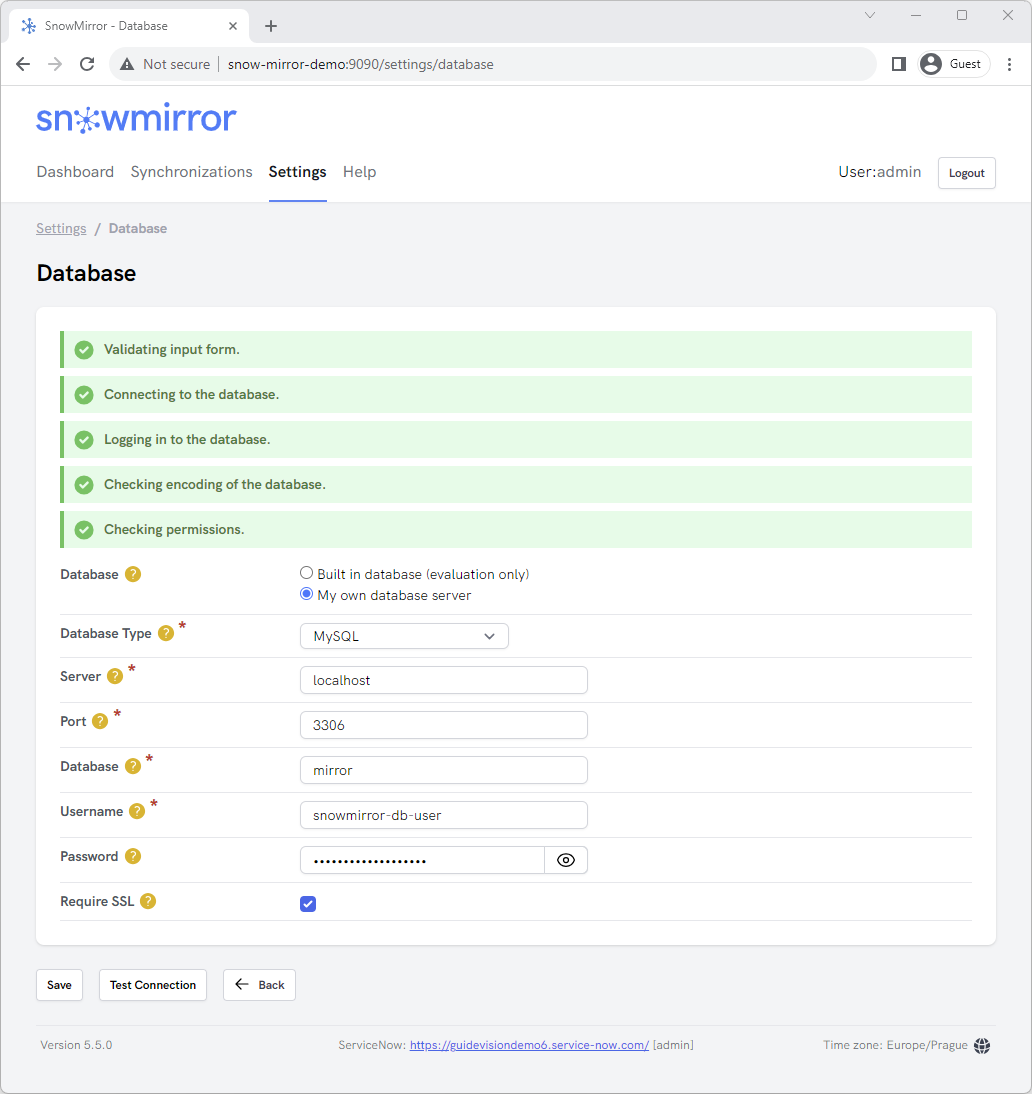
The next step is to configure replication between your own ServiceNow test instance and a real database to be able to see the replicated data and to connect other tools to work with the data. In this stage, you need admin access to one of your ServiceNow instances (UAT or test instance is ideal) and you need either to install a database on your notebook or you need to set up a database for you inside your company. We recommend you to use a ServiceNow admin account and keep a detailed permission configuration for Stage 3.

  1. Create a new ServiceNow user account dedicated for SnowMirror. Assign the admin role to this user.
  2. (optional) Activate the ServiceNow Aggregate Web Services Plug-In. It enables some cool SnowMirror features and slightly improves its performance.
  3. Install or prepare a real database. We recommend using a target database. However, to unzip and run a MySQL DB might be an easier way for this stage.
  4. Go to SnowMirror, then go to Settings -> Database and configure your mirror database connection. Use the Test Connection button to troubleshoot issues.


  5. Generate another trial license, this time for your ServiceNow instance. Go to Settings -> License and enter it.
  6. Go to Settings -> ServiceNow and configure new ServiceNow instance and credentials. Use Test Connection button to see if everything works.
  7. Run Clean & Synchronize on all existing synchronizations. Add some new ones.
  8. Connect to the mirror database by using a database tool or by your target reporting application or BI tool.

Stage 3: Proof of concept (4 hours)

The last stage is about installing SnowMirror on a server and building an environment very similar to the future production system. The goal is to use target operating system, target database, permission schema identical with a production instance and to evaluate long-term operations and scheduled replication.

  1. Install SnowMirror on a server with a target OS. On Windows use Custom Installation and configure host, ports and a config DB. Read more in our admin guide.
  2. Use similar database and ServiceNow settings as in the last stage.
  3. (optional) If your policy does not allow admin accounts for integrations please configure the ServiceNow user account to have correct permissions. Use the Test Connection button to troubleshoot.
  4. Configure several tables to synchronize using the scheduler. Use the Export/Import feature to transfer settings from the last stage.
  5. Setup email notifications using Settings -> Notifications
  6. (optional) Install the SnowMirror Dashboard, the ServiceNow application.
  7. (optional) Use SnowMirror REST API to monitor SnowMirror.
Facebook-f Twitter Youtube
GuideVision, s.r.o.
Türkova 2319/5b
149 00 Praha 4
Czech Republic
+420 222 508 297
info@snow-mirror.com
Manage Cookie Consent

To provide the best experiences, we use technologies like cookies to store and/or access device information. Consenting to these technologies will allow us to process data such as browsing behavior or unique IDs on this site. Not consenting or withdrawing consent, may adversely affect certain features and functions.

Functional Always active
The technical storage or access is strictly necessary for the legitimate purpose of enabling the use of a specific service explicitly requested by the subscriber or user, or for the sole purpose of carrying out the transmission of a communication over an electronic communications network.
Preferences
The technical storage or access is necessary for the legitimate purpose of storing preferences that are not requested by the subscriber or user.
Statistics
The technical storage or access that is used exclusively for statistical purposes. The technical storage or access that is used exclusively for anonymous statistical purposes. Without a subpoena, voluntary compliance on the part of your Internet Service Provider, or additional records from a third party, information stored or retrieved for this purpose alone cannot usually be used to identify you.
Marketing
The technical storage or access is required to create user profiles to send advertising, or to track the user on a website or across several websites for similar marketing purposes.
Manage options Manage services Manage vendors Read more about these purposes
View preferences
{title} {title} {title}